
ABR's photography knowledgeable, Simon Thomas, shares his secrets for creating the superb excessive dynamic range riding shots.
Most individuals appear to either love or hate HDR (high Dynamic range) photograph photographs. individually, i like them, however best when they're carried out neatly. There are two types of HDR, the respectable form that makes individuals's faces scrunch up and sweetness 'how did he/she shoot that'? Then there's evil HDR that looks like someone grabbed a picture from Tron while on hallucinogens. unfortunately most HDR images out there are overworked, over-saturated and over edited, to the aspect that they're unrecognisable from what the photographer noticed when searching through the digicam lens. remember, when it involves HDR pictures 'much less is more'.
what is HDRHDR is a publish editing approach that permits the photographer to trap in any other case inconceivable photographs. even if you're taking pictures in auto or a carefully calculated manual mode, your camera is limited to what element it will possibly trap. in case you're taking pictures in dark or shadowing situations you'll lose aspect in the brighter areas and conversely in shiny conditions you'll lose the element at the hours of darkness regions. the usage of this HDR technique, that you may get all of it because it effortlessly combines the details from a number of images to create a single, distinctive shot.
establishing your digital cameraWe need to shoot for HDR, which capacity establishing your digicam to capture threefi ve photos of the exact equal scene, shot at diff erent exposures. One photo can be shot on the ideal exposure for the scene and the others should be over-exposed and below-exposed. See the illustration on the subsequent web page.
Set your digicam on a tripod. Put your camera in Aperture mode and choose a mid latitude f-stop like f8. deploy your shot and choose where you want to shoot the rider as they flow via your scene. Press the shutter button half means down to carry that enviornment into focus, then lock in the center of attention via turning the auto focal point off. if your camera or lens has 'VR' (vibration discount) flip it off.

Now discover the 'bracket' button for your digicam and turn it on. We're telling the digicam to capture one as it should be uncovered graphic after which a couple of other photos which are each brighter and darker. Use your digicam's sub-command button to choose the bracketing quantity to either one or two stops. We need a bracketed set of as a minimum three photos. I always set my digicam to shoot five to 9 images and that i then opt for the optimum photographs to create my remaining HDR photo. in case you can alter your camera's colour metering, then set it to Matrix. Set your digicam into 'burst' mode, often known as 'continual excessive shooting mode'.
■ TIP Use a tri-pod if in case you have one. Set your digital camera into burst mode so that you can take multiple photographs without delay via holding down the shutter unencumber button.
■ TIP Use a low ISO if viable; are attempting ISO 200, one hundred or lessen in case your scene is bright enough.
entering into placeAsk the rider to reasonable their velocity. If the rider is just too quick, they'll pass through your scene at once and also you'll miss capturing the bracketed pictures you need to capture.
As your rider hits the center of attention area press the shutter free up and cling it down to enable your digital camera to capture the fiveplus bracketed photos that we need.
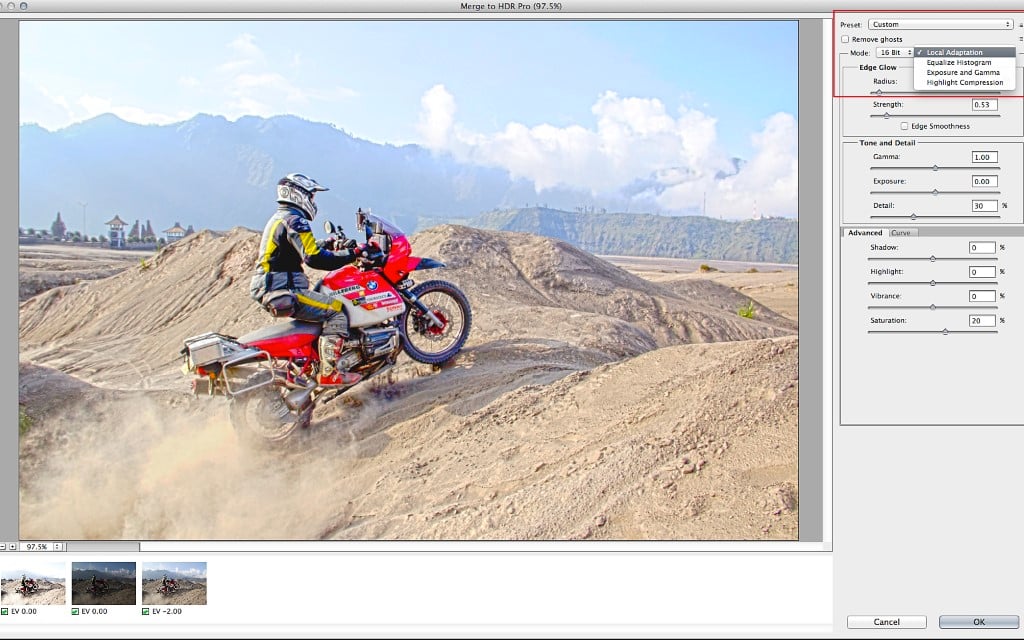
A Bridge too farOpen up Adobe Bridge, browse to the place you've saved your bracketed pictures and choose three pictures you need to work with. I select the standard publicity photograph after which one this is shot at +2 stops (vibrant – er) and -2 stops (darker). select all three photos and then choose equipment broadly speaking menu (exact row), then opt for Photoshop from the dialog alternate options and lastly select Merge to HDR pro from the grey drop down container.

in the Merge to HDR seasoned dialogue that has now seemed on your screen, you'll see the three photographs you've selected and Photoshop's ultimate wager as to how you'd like the pictures combined into a single graphic in most cases preview pane. It's ok, however we can do greater. select the local Adaption from the precise right of the talk. See illustration above.
Settingsadequate, there's nobody dimension matches all set of parameters that's going to swimsuit every type of photograph scene. take a look at the setting within the example above. I customarily use these as a starting point earlier than I start to quality-tune the sliders and commit to a remaining output image. Enter these atmosphere into your HDR and scan from there. keep in mind this is going to be a two-stage technique. if you consider your photograph wants a bit more contrast then increase the S-Curve the use of the settings beneath as a suggestion.
remove Ghost: assess
Radius:176
power:0.47
Gamma:0.76
exposure: 0.30
detail: 300
Shadow: ninety
highlight: -ninety
Vibrance: -5
Saturation: -1
if you're chuffed, head all the way down to the lessen appropriate of the leading communicate box and select good enough. this may close down the talk container and launch your HDR file interior Photoshop.
You're well-nigh there. From inside Photoshop head to the main true menu and choose 'retailer as' and retailer this new picture as a TIFF onto your computing device or favourite area.
Now, from Photoshop's file menu, opt for the graphic you've just saved. earlier than you opt for open, click on the format drop down talk and choose the 'digicam raw' alternative. this could launch the file into Adobe's camera uncooked ambiance instead of directly into Photoshop.
internal camera raw I at all times lower the saturation, cut back the vibrancy and raise the dark blacks and distinction. It's very own option but i love my HDRs to look refined. however hey, if that neon, eye-searing saturation, mega element thing is for you, then go for it. here's the numbers I used in stage two for this shot of me driving internal a super volcano crater on the island of Java.
exposure:.-42 darkens the photograph a bit
distinction: -34 opens some of the mid tone element
Highlights: -2
Shadows: -14 darkens the shadows
Whites: +2 brightens the whites
Blacks: -53 puts back some dark contrast
readability: +forty five brings out that HDR particular appear
Vibrance:-24 reduces any false coloured seem to be
Saturation:-eight makes the picture seem to be more natural
finally, click on the lens correction icon in the proper correct of the leading digital camera uncooked talk box after which select the manual tab. at the bottom of the panel you see the Lens Vignetting option. Drag the slider to the left to between 70-80.
opt for the 'shop photo' alternative in the bottom left of the digital camera uncooked talk container and at last choose a file class (.jpg) and a place to save your newly created HDR graphic.
Now go and get an extended drink, you've earned it.


Tidak ada komentar:
Posting Komentar