
ABR's photography knowledgeable, Simon Thomas, shares his secrets for creating the best high dynamic range riding photographs.
Most people appear to both love or hate HDR (excessive Dynamic range) photo photos. in my view, i really like them, however handiest after they're finished neatly. There are two styles of HDR, the good form that makes individuals's faces scrunch up and sweetness 'how did he/she shoot that'? Then there's evil HDR that looks like someone grabbed a photo from Tron whilst on hallucinogens. unluckily most HDR images obtainable are overworked, over-saturated and over edited, to the factor that they're unrecognisable from what the photographer saw when looking during the digicam lens. remember, when it involves HDR images 'less is more'.
what's HDRHDR is a submit modifying method that permits the photographer to catch otherwise unattainable images. even if you're shooting in auto or a carefully calculated manual mode, your digicam is restricted to what detail it may well catch. if you're taking pictures in darkish or shadowing conditions you'll lose element within the brighter areas and conversely in shiny situations you'll lose the detail in the dead of night areas. using this HDR method, which you could get all of it because it comfortably combines the details from a number of images to create a single, distinctive shot.
setting up your digital cameraWe should shoot for HDR, which capability developing your digital camera to capture threefi ve photos of the actual identical scene, shot at diff erent exposures. One graphic might be shot at the most excellent exposure for the scene and the others may be over-uncovered and under-uncovered. See the example on the next web page.
Set your digicam on a tripod. Put your digital camera in Aperture mode and choose a mid latitude f-stop like f8. set up your shot and decide where you need to shoot the rider as they circulate through your scene. Press the shutter button half method down to convey that enviornment into center of attention, then lock in the focus through turning the auto center of attention off. in case your digicam or lens has 'VR' (vibration reduction) turn it off.

Now find the 'bracket' button for your digicam and turn it on. We're telling the digital camera to seize one correctly uncovered photograph after which a couple of different photos that are each brighter and darker. Use your camera's sub-command button to select the bracketing amount to both one or two stops. We want a bracketed set of at the least three pictures. I always set my digital camera to shoot 5 to 9 pictures and that i then select the most reliable photos to create my closing HDR image. if you can alter your digital camera's shade metering, then set it to Matrix. Set your digital camera into 'burst' mode, often known as 'continuous excessive taking pictures mode'.
■ TIP Use a tri-pod when you have one. Set your digicam into burst mode so you can take assorted images promptly through conserving down the shutter unlock button.
■ TIP Use a low ISO if feasible; try ISO 200, one hundred or lower if your scene is brilliant ample.
moving into placeAsk the rider to moderate their pace. If the rider is too quickly, they'll move via your scene immediately and you'll omit capturing the bracketed pictures you need to seize.
As your rider hits the focal point enviornment press the shutter unencumber and hang it right down to permit your digital camera to catch the fiveplus bracketed pictures that we want.
A Bridge too a long wayOpen up Adobe Bridge, browse to the place you've saved your bracketed pictures and select three pictures you are looking to work with. I opt for the average publicity image after which one it truly is shot at +2 stops (bright – er) and -2 stops (darker). opt for all three photographs and then select tools commonly menu (true row), then select Photoshop from the dialog alternatives and ultimately opt for Merge to HDR pro from the gray drop down container.

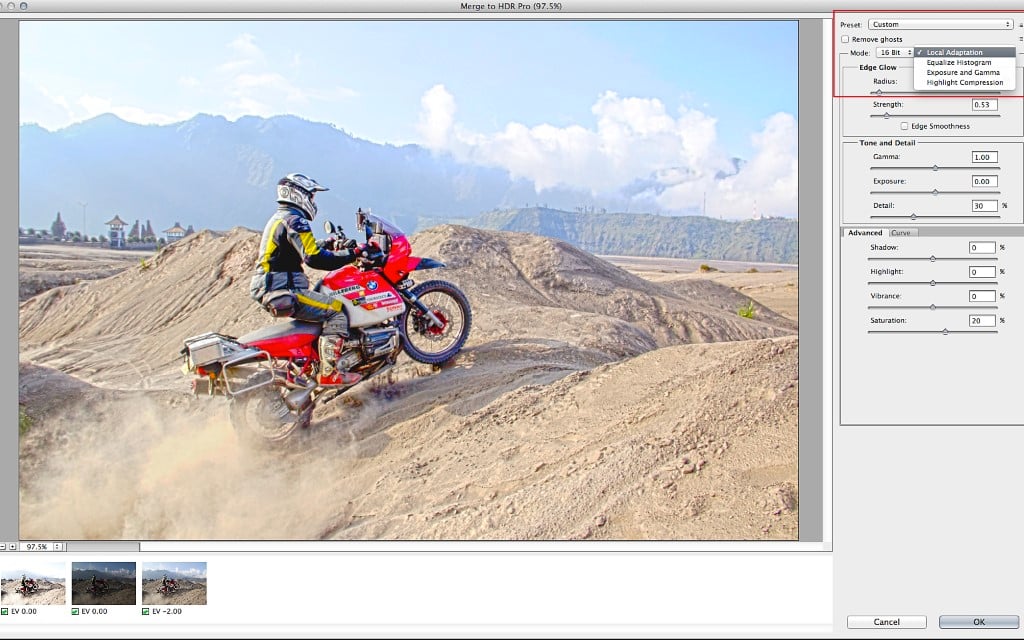
in the Merge to HDR pro communicate that has now regarded in your screen, you'll see the three pictures you've selected and Photoshop's optimum bet as to the way you'd just like the photographs combined into a single photograph in most cases preview pane. It's adequate, but we can do enhanced. select the local Adaption from the suitable appropriate of the talk. See instance above.
Settingsadequate, there's no one size fits all set of parameters that's going to go well with every kind of picture scene. take a look at the environment in the illustration above. I typically use these as a place to begin earlier than I begin to exceptional-tune the sliders and commit to a closing output image. Enter these environment into your HDR and experiment from there. keep in mind this is going to be a two-stage procedure. in case you suppose your image needs a bit greater contrast then boost the S-Curve the use of the settings under as a guideline.
eradicate Ghost: examine
Radius:176
energy:0.forty seven
Gamma:0.76
publicity: 0.30
element: 300
Shadow: 90
spotlight: -90
Vibrance: -5
Saturation: -1
if you happen to're chuffed, head down to the reduce correct of the main dialogue box and choose adequate. this could close down the dialogue box and launch your HDR file inside Photoshop.
You're very nearly there. From inside Photoshop head to the main desirable menu and select 'shop as' and keep this new graphic as a TIFF onto your computing device or preferred vicinity.
Now, from Photoshop's file menu, choose the picture you've just saved. before you opt for open, click on the format drop down talk and select the 'digicam uncooked' alternative. this may launch the file into Adobe's digicam raw ambiance as a substitute of without delay into Photoshop.
interior camera uncooked I continuously decrease the saturation, cut back the vibrancy and raise the darkish blacks and distinction. It's personal selection but i like my HDRs to appear delicate. however hi there, if that neon, eye-searing saturation, mega aspect component is for you, then go for it. here's the numbers I utilized in stage two for this shot of me riding inner an excellent volcano crater on the island of Java.
publicity:.-42 darkens the photo a bit
distinction: -34 opens probably the most mid tone aspect
Highlights: -2
Shadows: -14 darkens the shadows
Whites: +2 brightens the whites
Blacks: -fifty three puts lower back some darkish contrast
clarity: +45 brings out that HDR specified seem to be
Vibrance:-24 reduces any false coloured seem
Saturation:-8 makes the image appear more natural
finally, click on the lens correction icon in the exact correct of the main digital camera raw speak field and then opt for the guide tab. on the bottom of the panel you see the Lens Vignetting alternative. Drag the slider to the left to between 70-80.
select the 'keep photo' alternative within the bottom left of the digicam uncooked dialogue box and at last select a file category (.jpg) and a vicinity to store your newly created HDR photo.
Now go and get a protracted drink, you've earned it.


Tidak ada komentar:
Posting Komentar